This is a version of an article originally published in Amateur Astronomy Magazine #61 (Spring 2009)
In this day and age of imaging fever and wonderful gizmos which enable amateur astronomers to get the marvellous pictures that they do, the fine old tradition of astronomical sketching – particularly deep sky sketching – is almost overlooked in favour of high-tech equipment reviews and glossy shots of galaxies, nebulae and clusters, certainly in the more ‘glossy’ publications on the market. Luckily Amateur Astronomy Magazine and the Webb Deep Sky Society’s Deep Sky Observer cater for all of us, visual observers and imagers alike.
Being a person who likes to keep things simple, I don’t bother with the high-tech and deliberately stay low key for my observing. Not for me computers, CCD cameras, Go-To devices, webcams and guided telescopes (although a set of digital setting circles, such as Argo Navis, and an equatorial platform would be very nice). No, it’s just me, my 12-inch Dobsonian (unguided), a selection of eyepieces and sketchpad and pencils. I don’t even have a proper observatory, just a shed to keep my scope in and I just wheel the scope out to observe. Part of my distaste for ‘21st century-style’ observing is lack of disposable income to spend on the necessary equipment; the rest is a distinct lack of enthusiasm for hassle. Also, I have tried CCD imaging and didn’t like it because I felt divorced from what I was observing – I could have been on the internet or watching TV for all the difference it made to me – and I found it way too fiddly for my liking.
I know that many people feel the way I do but I have put together this small piece on observing and sketching the deep sky for the unconverted or unconvinced folks out there. It’s not a definitive article on visual observing, by any means – and there are some good books on the market about the art of visual deep sky observing, to which I’ll return later – but this is based on the way in which I do observing and I hope you enjoy it. Also, it’s not a ‘how to’ but more an encouragement to ‘get out there and do it’.
When I set my scope up, I leave it for at least an hour for the mirror to cool – generally the larger your mirror, the longer it takes to cool and if the mirror is at the same ambient temperature as the air the view will be steadier. I also use the twilight setting up time to adjust the collimation and to align the finders – I use both a traditional finder (10×50 in my case) and a Telrad and I mostly use the Telrad to get into the correct area and the 10×50 finder to verify star fields if necessary – and get the rest of my observing gear together: charts, sketchbook, drawing equipment, eyepieces and the all-important dim red observing torch (mine is a red-LED type).
Filters are useful for nebulae but don’t work on galaxies (apart from the HII regions within some galaxies) or star clusters (unless containing nebulosity). The most useful filters for deep sky are Oxygen III filters (for planetary nebulae especially) and Ultra High Contrast for most other nebulae. Hydrogen Beta filters are more limited but are good if you want a crack at the Horsehead Nebula.
Another invaluable part of observing equipment is a length of black material – a black t-shirt will do – to put over your head and the eyepiece to keep out extraneous light. This is particularly important if you are observing in an area with significant light trespass such as that from a nearby streetlamp or a lighted window and using a hood will significantly improve the view and therefore your chances of seeing that faint galaxy or nebula. I use an ‘observing vest’, made and sold by Dragan and Anja Nikin of Dark Skies Apparel.

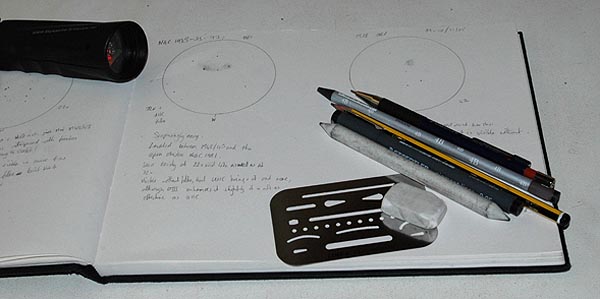
For sketches and notes, I use an A4 (US equivalent is 8.3 x 11.7 inch paper) hardbound sketchbook and in it I draw 3-inch circles to represent the eyepiece view. Some observers don’t use circles, but I find that a circle keeps things neat. Three inches is, I find, a good size – too small a circle and things get a little cramped and distorted, too large a circle and things become a little too spread out, but use a size you feel comfortable with. Below the circles I leave a space for written notes about the object as well as the other important data such as date, telescope used and the conditions (weather, seeing, transparency, etc). Adding directions is also an important part of sketches and notes: at the very least, indicate where ‘west’ or ‘preceding’ is – that is easily found by watching the drift of the stars out of the field of view, as the direction of travel is west. For elongated objects, it is useful to indicate the direction in which the object is elongated, e.g.’ elongated north-south’ for example.
Once I begin observing, and I have found the object that I am looking for, I take a good look at it, noting its size, shape and relation to anything else in the field of view. I then start the sketch, first putting in the field stars – certainly the brightest ones – before moving onto the object itself. Galaxies are, perhaps the easiest of deep sky objects to draw; if you can draw a smudge then you can draw a galaxy, because at first glance a lot of them look like smudges, barely discernible dim little ovals set against a dark background. As for star clusters, they are represented by groups of dots of varying sizes according to the star’s brightness (the brighter the star, the fatter your dot on the paper will be).
To put in the object, if it is a nebulous object such as a galaxy, nebula or unresolved cluster, I draw in the basic shape of the object with a soft 2B or 3B pencil and create the nebulous effect by rubbing with a blending stump or tortillon. You can use a fingertip in place of a blending stump but personally I find this a messy process!
To sketch an object I do the following:
Firstly, I put in the field stars (if you are doing galaxies, there often aren’t that many field stars to bother with, unlike objects within the Milky Way itself). Then I add the object, then I smooth the object impression with a blending stump or finger and add any dark lanes (in negative, if you are using graphite pencil on white paper) by erasing the pencil marks in the appropriate area. Finally I generally tidy it up and shape it to the right proportions. Once indoors under bright lights, or next day, the sketch may look like a mess, which is one of the pitfalls of doing things in the dark by a dim red light, so you can do a perfect version of the sketch or tidy up the original. Be careful not to add things in that you didn’t see, though.
Keep looking in the eyepiece and try various magnifications, especially for small objects such as most galaxies and planetary nebulae. Higher magnifications might bring out some features not otherwise seen or they might ruin the view altogether. Likewise filters. I sometimes make a couple, or even three, drawings of the same object, showing it at various magnifications, with and without a filter. Experimentation, and seeing as much as possible, is part of the fun of observing.

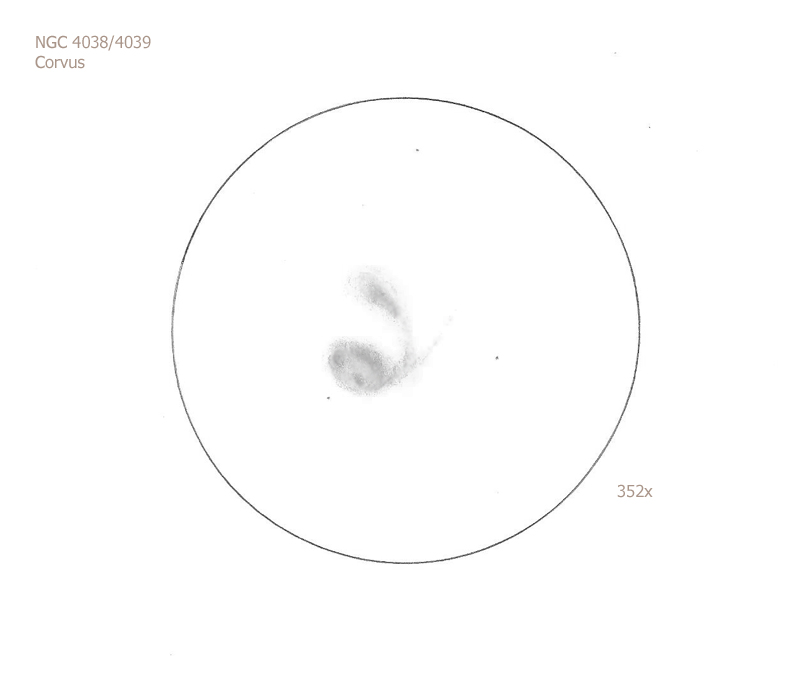
NGC 4038 and 4039/Crv, 36" dob, TSP 2010
Give sketching a go, it’s fun and not as difficult as you think. You think you can’t draw? Well, I can’t play a musical instrument, in fact I am hopeless at it being tone deaf, but I had a go anyway and practice makes perfect as they say. Not only is it fun, but for minimal outlay (once you have your scope) you can create a permanent record of your observing sessions. When I look back at my observing notes and sketches, I am immediately taken back to that night, no matter how long ago it was or where it was – my notes and sketches take me back to glittering star clusters, enchanting galaxies and nebulae and the sound of owls and foxes, barking dogs and the wind in the trees. My notes and sketches also immediately transport me everywhere I have observed the night sky, from my back yard in the Isle of Wight, England to the Texas Star Party to Australia.
Earlier in the article I mentioned visual observing books, and in particular books about sketching the deep sky, or include sketches of the deep sky. There are a few visual deep sky observing books on the market, and these are the ones I particularly recommend:
Visual Astronomy of the Deep Sky by Roger N. Clark
Observing Handbook and Catalogue of Deep Sky Objects by Christian Luginbuhl and Brian A. Skiff
Deep Sky Observing: the Astronomical Tourist by Steve Coe
The Deep Sky Companions series (The Messier Objects, The Caldwell Objects and Hidden Treasures) by Stephen James O’Meara
The Deep Sky by Philip S. Harrington
Observing the Deep Sky by Darren Bushnall
Astronomical Sketching: A Step-by-Step Introduction by Richard Handy, David B. Moody, Jeremy Perez, Erika Rix and Sol Robbins. This book is excellent for beginners to astronomical sketching and goes in to the techniques in detail for deep sky sketching as well as lunar, planetary, solar and comet drawing.
There are others, and a search on Amazon.com or Amazon.co.uk (type in deep sky observing) will bring you to them.
I hope you have enjoyed this article and if it has inspired even one person to get out and visually observe and sketch the deep sky then it will have been a success.
Clear skies and happy sketching!
Faith Jordan
http://www.fjastronomy.com